Easy Pineapple Coconut Thumbprints: Your Quick Tropical Treat Escape
Imagine the warm sun on your skin, the gentle sway of palm trees, and the refreshing taste of the tropics – all from the comfort of your kitchen. Our pineapple coconut thumbprint cookies are more than just a dessert; they're a mini-vacation in every bite. Combining a buttery shortbread base with the vibrant sweetness of pineapple preserves and the creamy, aromatic allure of shredded coconut, these delightful treats promise a quick escape to paradise without the fuss.
Perfect for sharing at gatherings, gifting to friends, or simply brightening your day, these easy pineapple coconut thumbprint cookies are designed for maximum flavor with minimal effort. Get ready to impress your taste buds and transport yourself to a sunny beach with this irresistible recipe!
Why These Pineapple Coconut Thumbprint Cookies Are Your Next Baking Obsession
There's a special kind of magic in creating something delicious that also evokes a sense of place. These particular pineapple coconut thumbprint cookies excel at this, instantly whisking you away to a sun-drenched Hawaiian shore. But their appeal goes beyond just their exotic flavor profile:
- Effortlessly Impressive: Despite their elegant appearance, these cookies are surprisingly straightforward to make. Their charm lies in their rustic beauty and vibrant filling, making them a centerpiece on any dessert platter without demanding advanced baking skills.
- A Symphony of Flavors: The rich, melt-in-your-mouth shortbread base provides the perfect canvas for the sweet-tart burst of pineapple and the comforting, nutty notes of coconut. It's a harmonious blend that tantalizes the palate.
- Quick & Convenient: From mixing bowl to cooling rack, you're looking at roughly 30-40 minutes. This makes them ideal for last-minute cravings, spontaneous get-togethers, or when you need a joyful baking project that fits into a busy schedule.
- Customizable Fun: Thumbprint cookies are inherently versatile. While our focus is on pineapple and coconut, the base recipe is a fantastic springboard for other flavor explorations, making them truly your own.
- Universal Appeal: Who can resist a tropical treat? These cookies are a guaranteed crowd-pleaser, appealing to both adults and children with their delightful texture and sunny taste.
When you crave something fun, tasty, and utterly without fuss, these pineapple coconut thumbprint cookies tick all the boxes. They're not just cookies; they're little parcels of happiness.
Decoding the Deliciousness: Key Ingredients and Savvy Substitutions
The secret to any outstanding cookie lies in its ingredients. For our pineapple coconut thumbprint cookies, we focus on quality components that work in harmony to create that distinctive tropical taste. Here’s a closer look at what you’ll need, along with smart substitutions to suit your pantry and preferences:
- Unsalted Butter (Softened): The foundation of our tender shortbread, butter provides richness and flavor. Using unsalted butter allows you precise control over the overall saltiness of your cookies.
Savvy Swap: If you only have salted butter, simply reduce the added salt in the recipe by about ¼ teaspoon to maintain balance. Ensure your butter is softened to room temperature for proper creaming – it should yield to a gentle press, but not be greasy. - Granulated Sugar: Sweetness and a delicate crispness come from granulated sugar. It helps create that light and fluffy texture when creamed with butter.
Savvy Swap: For a warmer flavor profile and a slightly chewier cookie, consider substituting with light brown sugar. The molasses in brown sugar adds depth and moisture, subtly changing the texture. - Large Egg Yolk: The egg yolk is a magical ingredient in shortbread, adding richness, tenderness, and a beautiful golden hue to your cookies without making them tough. It acts as an emulsifier, binding everything together.
Savvy Insight: Don't discard the egg white! Save it for an omelet, meringue, or a different baking project. - Vanilla Extract: A universal enhancer, vanilla extract deepens and rounds out the sweet flavors. It’s a must-have for virtually any cookie.
Savvy Boost: For an extra layer of tropical decadence, consider adding a tiny splash of coconut extract (about ¼ teaspoon) alongside the vanilla. This intensifies the coconut flavor beautifully. - All-Purpose Flour: The structural backbone of our cookies. All-purpose flour provides the right balance of gluten for a tender, yet stable, cookie.
- Salt: Essential for balancing sweetness and enhancing all other flavors. A little salt goes a long way in making your cookies taste vibrant.
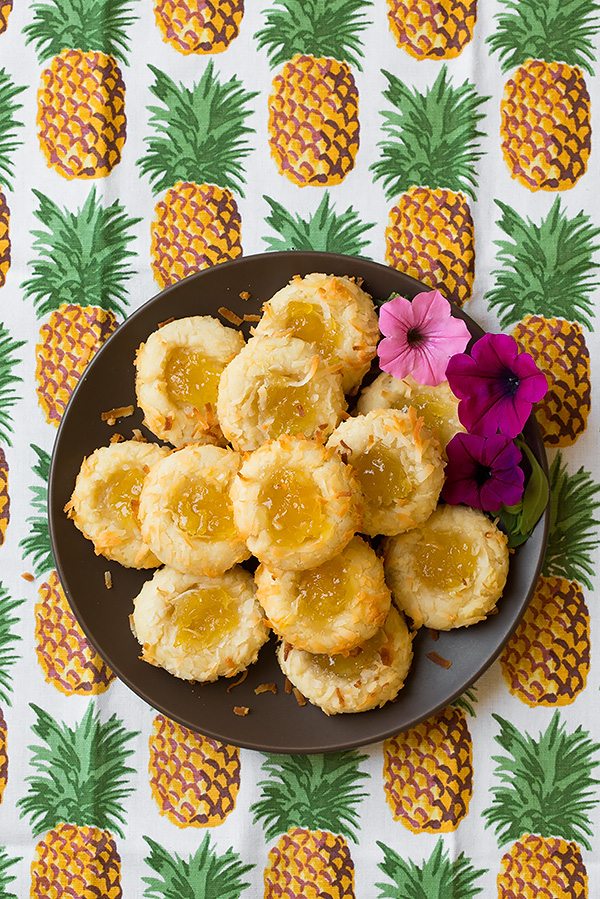
- Shredded Sweetened Coconut: This provides both texture and that unmistakable tropical flavor. We use it both in the dough and as a coating.
Savvy Swap: If you prefer less sweetness or want more control over the sugar content, unsweetened shredded coconut works perfectly. For an added layer of flavor and crunch, try gently toasting your coconut before incorporating it, or even mix in some finely chopped macadamia nuts for a truly Hawaiian twist! - Pineapple Preserves or Jam: The bright, tangy, and sweet heart of these thumbprints. The preserves provide that burst of tropical fruitiness.
Savvy Swap: If pineapple preserves are hard to find, apricot or peach jam makes an excellent alternative, offering a lovely fruity counterpoint to the coconut. For an even more vibrant pineapple filling, stir in a tiny pinch of fresh lemon zest and a squeeze of lemon juice into your preserves before filling the cookies.
By understanding the role of each ingredient and knowing your substitution options, you’re empowered to make these cookies truly your own, ensuring they’re always a delicious success!
Crafting Perfection: Step-by-Step Guide to Your Tropical Thumbprints
Ready to bring the taste of the tropics to life? This straightforward recipe ensures perfectly baked pineapple coconut thumbprint cookies every time. You’ll need approximately 15 minutes for prep and another 15 minutes for baking, plus a little cooling time, totaling around 30-40 minutes from start to finish.
Ingredients You’ll Need:
- 1 cup unsalted butter, softened
- 2/3 cup granulated sugar
- 1 large egg yolk
- 1 teaspoon vanilla extract (optional: + 1/4 tsp coconut extract)
- 2 cups all-purpose flour
- 1/2 teaspoon salt
- 1/2 cup shredded sweetened coconut (plus extra for rolling)
- 1/2 cup pineapple preserves or jam (optional: + tiny pinch lemon zest/juice)
Step-by-Step Instructions:
- Preheat and Prepare: Start by preheating your oven to 350°F (175°C). Line a baking sheet with parchment paper or a silicone baking mat. This prevents sticking and ensures even baking.
- Cream Butter and Sugar: In a large mixing bowl, using an electric mixer, cream together the softened butter and granulated sugar. Beat on medium speed until the mixture is light, fluffy, and pale yellow, which usually takes about 2-3 minutes. This step is crucial for incorporating air, resulting in a tender cookie texture.
- Add Egg Yolk and Vanilla: Beat in the large egg yolk and vanilla extract (and optional coconut extract) into the creamed butter mixture until thoroughly combined. Scrape down the sides of the bowl to ensure everything is incorporated.
- Mix Dry Ingredients: In a separate medium bowl, whisk together the all-purpose flour and salt. Whisking ensures the salt is evenly distributed through the flour.
- Combine Wet and Dry: Gradually add the dry flour mixture to the wet butter mixture, mixing on low speed until just combined. Be careful not to overmix, as this can develop the gluten too much, leading to tough cookies.
- Incorporate Coconut: Gently fold in the ½ cup of shredded sweetened coconut into the dough until evenly distributed.
- Form and Indent Cookies: Roll the dough into 1-inch balls. For uniform size, you can use a small cookie scoop. Roll each ball in extra shredded coconut, if desired, then place them about 2 inches apart on your prepared baking sheet. Using your thumb or the back of a rounded teaspoon, gently make an indentation in the center of each cookie ball. If the edges crack slightly, gently smooth them with your fingers.
- Fill with Preserves: Carefully spoon about ½ teaspoon of pineapple preserves into each indentation. Don't overfill, or the preserves might bubble over during baking.
- Bake: Bake for 12-15 minutes, or until the edges of the cookies are lightly golden and the centers are set. The preserves will be bubbly.
- Cool: Remove the baking sheet from the oven and let the cookies cool on the sheet for 5 minutes before carefully transferring them to a wire rack to cool completely. This allows them to firm up without breaking.
Once cooled, these pineapple coconut thumbprint cookies are ready to be devoured! Store them in an airtight container at room temperature for up to 3-4 days.
Mastering the Art of Thumbprints: Pro Tips for Flawless Cookies
While these pineapple coconut thumbprint cookies are designed to be easy, a few expert techniques can elevate your baking from good to absolutely glorious. Following these pro tips will ensure your cookies are not only delicious but also beautifully presented, perfect for any occasion. For even more in-depth guidance, check out our article: Bake Perfect Pineapple Coconut Thumbprints: Pro Tips Inside.
- Temperature is Key (Butter & Dough):
- Softened Butter: As mentioned, perfectly softened butter creams beautifully with sugar, creating an aerated, tender dough. If it's too cold, it won't cream properly; if it's too warm/melty, your cookies might spread too much.
- Chilling the Dough (Optional but Recommended): For ultimate shape retention, especially in warmer kitchens, consider chilling your dough for 20-30 minutes before rolling. This firms up the butter, helping the cookies hold their shape better during baking and preventing excessive spreading.
- Achieving Uniformity:
- Consistent Sizing: Use a small cookie scoop (about 1 tablespoon) or a kitchen scale to measure out dough portions (approx. 15-20g each). This ensures all your cookies bake evenly and look consistent.
- Damp Hands: If the dough feels sticky while rolling into balls, slightly dampen your hands with a little water. This prevents sticking and makes shaping much easier.
- Perfect Indentations:
- Gentle Flattening: After rolling each ball, gently flatten it ever so slightly before making the indentation. This provides a more stable base for the jam and reduces the likelihood of the cookie crumbling around the edges.
- Thumb or Tool: While the name suggests a thumb, the back of a rounded teaspoon (like a ½ teaspoon measuring spoon) often creates a cleaner, more uniform indentation.
- Prevent Cracks: If your dough cracks excessively when making the indent, it might be a bit too dry. You can add a tiny splash (1/2 teaspoon) of milk or water to the dough and gently mix, or ensure your butter was perfectly softened initially.
- Filling Finesse:
- Don't Overfill: This is a common pitfall! Overfilling leads to preserves bubbling over and potentially burning on the baking sheet. A small ½ teaspoon per cookie is usually sufficient.
- Consider Two-Stage Filling: For a vibrant, fresh-looking filling, you can bake the cookies for about 10-12 minutes until set, then pull them out, add the preserves to the still-warm indentations, and bake for the remaining 3-5 minutes. This prevents the jam from over-caramelizing.
- Brighten the Jam: As mentioned, a tiny amount of lemon zest or a drop of lemon juice stirred into your pineapple preserves before filling can really make the flavor pop!
- Coconut Coating: If you're rolling the cookies in extra shredded coconut, ensure the dough ball is well-formed before rolling. A gentle press will help the coconut adhere well.
By keeping these simple yet effective tips in mind, your batch of pineapple coconut thumbprint cookies will not only taste incredible but will also look like they came from a professional bakery. Happy baking!
Your Tropical Escape Awaits!
There you have it – a comprehensive guide to crafting the most delightful pineapple coconut thumbprint cookies. These little bundles of joy are more than just a quick treat; they're a testament to how simple ingredients, when combined with a little love, can transport you to a world of sunshine and sweet indulgence. Whether you're baking for a special occasion or simply craving a taste of the tropics, this recipe promises ease, flavor, and a guaranteed smile. So, roll up your sleeves, embrace the tropical vibes, and let your kitchen become your personal island getaway. Happy baking!
